English
 中文简体
中文简体How to Change a U-Joint: Step-by-Step DIY Guide
Content
- 1 How to Change a U-Joint: The Short Answer
- 2 What Is a U-Joint and What Does It Do?
- 3 Symptoms of a Bad U-Joint
- 4 Tools and Parts Required to Change a U-Joint
- 5 U-Joint Size Reference: Common Series and Dimensions
- 6 Step-by-Step: How to Change a U-Joint
- 6.1 Step 1: Safely Raise and Support the Vehicle
- 6.2 Step 2: Mark the Driveshaft Phase Orientation
- 6.3 Step 3: Remove the Driveshaft
- 6.4 Step 4: Remove the Snap Rings
- 6.5 Step 5: Press Out the Old Bearing Caps
- 6.6 Step 6: Clean the Yoke Bores
- 6.7 Step 7: Prepare and Install the New U-Joint
- 6.8 Step 8: Check U-Joint Movement and Grease If Applicable
- 6.9 Step 9: Reinstall the Driveshaft
- 6.10 Step 10: Test Drive
- 7 U-Joint Replacement Cost: DIY vs. Shop
- 8 How Long Do U-Joints Last and When Should You Replace Them?
- 9 Common U-Joint Replacement Mistakes and How to Avoid Them
How to Change a U-Joint: The Short Answer
Changing a U-joint involves marking the driveshaft orientation, unbolting or unclipping the driveshaft, pressing out the old bearing caps, pressing in the new U-joint, and reassembling in reverse order. The entire job typically takes 1 to 3 hours for a moderately experienced DIYer, and parts cost between $15 and $80 depending on vehicle type. A hydraulic press or a bench vise is the most critical tool — without one, removing the old bearing caps cleanly is significantly harder.
U-joints (universal joints) are cross-shaped rotating couplings that connect segments of a driveshaft and allow the shaft to transmit torque through changing angles — accommodating suspension movement and drivetrain geometry as the vehicle drives. When a U-joint fails, vibration, clunking, and in severe cases complete driveshaft separation can result. Replacing a worn U-joint promptly is one of the most important drivetrain maintenance tasks on rear-wheel-drive and four-wheel-drive vehicles.
What Is a U-Joint and What Does It Do?
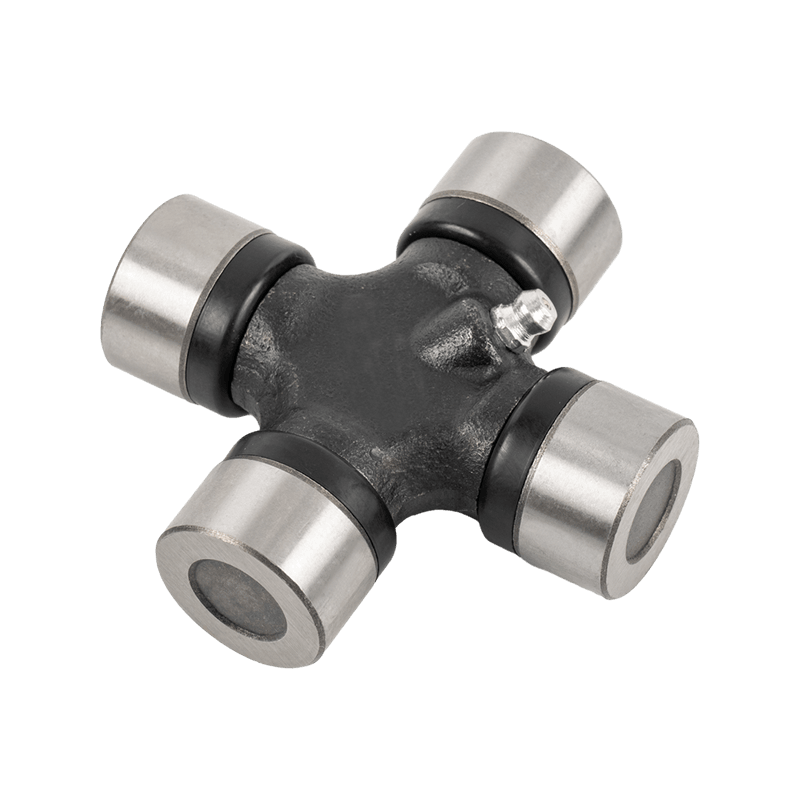
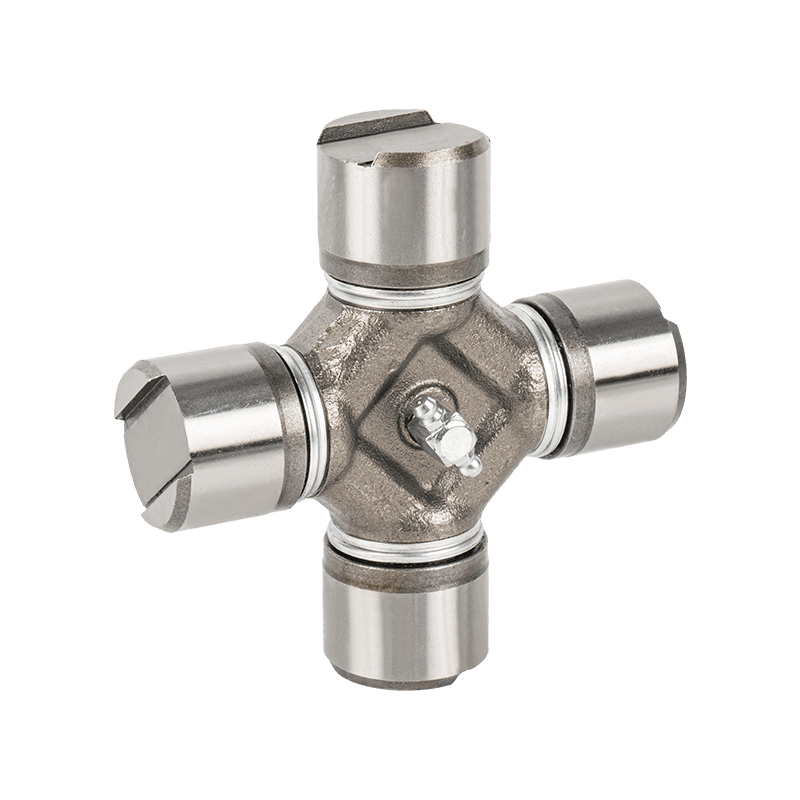
A U-joint consists of a central cross-shaped body — called the spider or trunnion — with four arms, each fitted with a needle-bearing cap. The caps are held in the yokes of two adjacent driveshaft sections by snap rings or bearing straps, allowing the two shafts to rotate together while bending at an angle of up to approximately 15–25 degrees depending on the design.
Most rear-wheel-drive trucks, SUVs, and performance cars use two or more U-joints along the driveshaft: one at the transmission output and one at the differential pinion. Four-wheel-drive vehicles typically have additional U-joints in the front axle shafts as well. Over time, the needle bearings inside the caps dry out, corrode, or wear, causing the U-joint to develop play — and eventually to fail.
U-joints are greaseable (Spicer-style with a zerk fitting) or sealed (non-greaseable). Greaseable U-joints last longer when properly maintained — greasing every 5,000 miles or at each oil change significantly extends service life. Sealed units require no maintenance but cannot be serviced once the lubricant degrades.
Symptoms of a Bad U-Joint
Catching a failing U-joint early prevents more expensive driveshaft and differential damage. These are the most common and reliable warning signs:
- Clunking or knocking sound when shifting from Park to Drive or Reverse: This is typically the first noticeable symptom — the loose U-joint slaps the yoke as torque loads reverse direction.
- Vibration felt through the floor or seat at highway speeds (55–70 mph): A worn U-joint creates an imbalance in the spinning driveshaft, producing a vibration that intensifies with speed. This is often confused with tire balance issues initially.
- Squeaking during acceleration from a stop: Dry needle bearings inside the U-joint caps produce a rhythmic squeak that corresponds to driveshaft rotation speed — faster acceleration means higher-pitched squeaking.
- Visible rust, flaking, or lateral play in the driveshaft U-joint: With the vehicle safely on jack stands, grasp the driveshaft at the U-joint and attempt to move it laterally. Any perceptible play — more than 1–2mm — indicates bearing wear and the U-joint should be replaced.
- Transmission fluid leak near the rear of the transmission: A severely worn front U-joint can damage the transmission output shaft seal through repeated impact loading, causing a fluid leak that is often misdiagnosed as a transmission problem.
Tools and Parts Required to Change a U-Joint
Gathering everything before you begin prevents mid-job interruptions. Here is a complete list of what you need:
Essential Tools
- Hydraulic press or bench vise: The single most important tool. A bench vise with a U-joint press kit (socket set used as press cups) is the most accessible option for home mechanics. A hydraulic shop press makes the job cleaner and easier.
- Jack and jack stands (minimum 2-ton rated): The vehicle must be safely elevated with the drivetrain accessible. Never work under a vehicle supported only by a floor jack.
- Snap ring pliers (internal and external): Most U-joints use snap rings or C-clips to retain the bearing caps in the yoke. Internal snap ring pliers remove the clips from the inside of the yoke bore.
- Socket set (1/4", 3/8", and 1/2" drive): You will need sockets to remove driveshaft mounting bolts and to use as press cups when pressing out bearing caps.
- Torque wrench: Required to reinstall driveshaft bolts to the correct specification — typically 15–20 ft-lbs for strap-style caps and 55–65 ft-lbs for flange bolts, though specifications vary by vehicle.
- Hammer and punch or drift: Used to drive out stubborn bearing caps after snap rings are removed, or to seat new caps if a press is unavailable.
- Penetrating oil (e.g., PB Blaster or WD-40 Specialist): Apply to snap ring grooves and bearing cap areas 15–20 minutes before disassembly to free corrosion on older vehicles.
- White paint marker or scribe: For marking driveshaft phase orientation before removal — critical for reassembly balance.
- Wire brush and brake cleaner: For cleaning yoke bores before installing the new U-joint.
Parts to Purchase
- Replacement U-joint: Match by vehicle year, make, and model, or by measuring the existing U-joint — specifically the cap diameter and the distance between cap centers (outside to outside of caps across both axes). Common sizes include the Spicer 1310, 1330, and 1350 series used on most American trucks and SUVs.
- Replacement snap rings: Many U-joint kits include new snap rings. Use the new ones — old snap rings may not seat properly after being removed.
- Driveshaft bolts (optional but recommended): If your vehicle uses strap-type bearing caps with small bolts, replace them with new hardware at reassembly — the bolts are torque-to-yield and should not be reused.
U-Joint Size Reference: Common Series and Dimensions
U-joints are sold by series designation based on their physical dimensions. The table below covers the most common Spicer series used on light trucks, SUVs, and performance vehicles in North America:
| Series | Cap Diameter | Cap Width (across flats) | Common Applications |
|---|---|---|---|
| 1310 | 1.062 in (26.99mm) | 3.219 in (81.76mm) | Light trucks, half-ton pickups, SUVs |
| 1330 | 1.062 in (26.99mm) | 3.625 in (92.08mm) | Heavy half-ton and 3/4-ton trucks |
| 1350 | 1.188 in (30.18mm) | 3.625 in (92.08mm) | 3/4-ton and 1-ton trucks, HD applications |
| 1480 | 1.188 in (30.18mm) | 4.188 in (106.38mm) | Heavy-duty trucks, commercial vehicles |
| CV / Double Cardan | Varies | Varies | Front driveshafts, lifted 4WD vehicles |
Step-by-Step: How to Change a U-Joint
The following procedure covers a standard rear driveshaft U-joint replacement on a rear-wheel-drive or four-wheel-drive truck or SUV — the most common DIY U-joint job. Front axle U-joints follow similar principles but require additional steps for hub and axle shaft removal.
Step 1: Safely Raise and Support the Vehicle
Chock the front wheels, engage the parking brake, and place the transmission in neutral so the driveshaft can rotate freely. Raise the rear of the vehicle with a floor jack positioned under the rear axle housing, then support the vehicle on two rated jack stands placed under the frame rails. Lower the axle slightly on the jack so the driveshaft hangs freely and you have working clearance.
Step 2: Mark the Driveshaft Phase Orientation
Before removing anything, use a white paint marker or scribe to mark the relationship between the driveshaft yoke and the differential flange, and between both driveshaft sections at the center carrier bearing if present. Reinstalling the driveshaft out of phase by even one spline position can cause severe vibration that requires a full driveshaft balance correction to fix.
Step 3: Remove the Driveshaft
Remove the driveshaft-to-differential bolts — typically four 12mm or 8mm bolts on strap-type caps, or four flange bolts. Support the driveshaft by hand as the last bolt comes out, then slide the front end of the shaft rearward out of the transmission tail housing slip yoke. Plug the transmission output with a clean rag to prevent fluid loss. Set the driveshaft on a workbench.
Step 4: Remove the Snap Rings
Examine the U-joint yoke. You will see four bearing caps — one in each arm of the yoke — retained by either internal snap rings seated in grooves inside the yoke bore, or external C-clips on the outside of the cap. Use internal snap ring pliers to collapse the snap rings and pop them out of their grooves. Apply penetrating oil and allow it to soak for 15 minutes if the snap rings are corroded and stiff. Do not skip removing all four snap rings before attempting to press out the caps — trying to press a capped bearing while a snap ring is still seated will damage the yoke bore.
Step 5: Press Out the Old Bearing Caps
Position the yoke in a bench vise or hydraulic press. Use one socket slightly smaller than the bearing cap bore diameter as the receiving cup on one side, and a larger socket that presses against the face of the opposite bearing cap on the other side. As you tighten the vise or activate the press, the cap on the receiving-cup side is driven into the larger socket and pops out. Rotate the yoke 180 degrees and repeat to remove the opposite cap. Repeat for the second axis.
If a cap is extremely stubborn due to corrosion, heat the yoke ear with a propane torch for 20–30 seconds — the yoke expands slightly and releases the cap. Do not apply heat to the bearing cap itself, as it will damage the needle bearings inside and may cause the cap to seize permanently.
Step 6: Clean the Yoke Bores
Once all four caps are removed and the old U-joint spider is free, inspect the yoke bores carefully. Use a wire brush and brake cleaner to remove all rust, corrosion, and debris from inside the bores. Check for grooves or damage in the bore walls — a lightly grooved bore is acceptable; a deeply scored or out-of-round bore indicates the yoke should be replaced. Clean snap ring grooves thoroughly with a pick tool to ensure new snap rings seat fully.
Step 7: Prepare and Install the New U-Joint
Remove the new U-joint from its packaging. Leave the plastic retaining clips or straps in place — these hold the needle bearings inside the caps during installation and fall away once the caps are pressed into the yoke. Do not pre-grease the needle bearings before installation — they are pre-packed from the factory and adding grease at this stage can force bearings out of position.
Start the spider into the yoke on one axis. Press one bearing cap into the yoke bore until it is flush or slightly below flush — just enough to expose the snap ring groove. Install the snap ring. Flip the yoke and press the opposite cap in, then install its snap ring. Repeat the process on the second axis. Tap each cap lightly with a hammer after installation to ensure the snap rings are fully seated in their grooves — a dull thud (not a metallic ring) confirms the snap ring is bottomed out.
Step 8: Check U-Joint Movement and Grease If Applicable
Once all four caps are installed and snap-ringed, flex the U-joint through its full range of motion by hand. It should move smoothly with light finger pressure and no binding, roughness, or tight spots. A binding U-joint after installation usually means a bearing cap is cocked slightly — remove the affected cap and reinstall it straight. If your new U-joint has a grease zerk fitting, inject fresh grease until it begins to weep slightly from all four caps, confirming all bearing cavities are filled.
Step 9: Reinstall the Driveshaft
Slide the front of the driveshaft back into the transmission slip yoke, aligning your phase marks. Align the rear yoke to the differential flange using the marks made in Step 2. Install new driveshaft bolts or straps and torque to the manufacturer's specification — commonly 15–20 ft-lbs for strap bolts and 55–80 ft-lbs for flange bolts, but always verify in your vehicle's service manual. Remove the rag from the transmission output, lower the vehicle, and remove jack stands.
Step 10: Test Drive
Drive the vehicle through a range of speeds — surface streets and highway — and test through acceleration, deceleration, and shifting between drive and reverse. All clunking, squeaking, and vibration associated with the failed U-joint should be completely gone. If vibration persists, recheck driveshaft phase orientation and confirm all snap rings are fully seated.
U-Joint Replacement Cost: DIY vs. Shop
Understanding the cost difference between doing the job yourself and taking it to a shop helps you make an informed decision:
| Cost Item | DIY Cost | Shop Cost |
|---|---|---|
| U-joint part (standard 1310/1330) | $15–$45 | $15–$45 (parts cost) |
| U-joint part (heavy-duty 1350/1480) | $35–$80 | $35–$80 (parts cost) |
| Labor | $0 (your time: 1–3 hrs) | $100–$250 (1–2.5 hrs at shop rate) |
| Tool investment (one-time) | $30–$80 (U-joint press kit) | N/A |
| Total (first-time DIY) | $60–$160 | $130–$330 |
For most truck and SUV owners who do their own maintenance, the DIY approach pays for itself on the first job — and the press kit is reusable for every U-joint replacement going forward. The only case where a shop visit is clearly preferable is when the yoke bores are damaged, the driveshaft requires balancing after replacement, or the front axle U-joints require complete hub disassembly.
How Long Do U-Joints Last and When Should You Replace Them?
U-joint service life varies widely depending on vehicle use, maintenance habits, and operating conditions:
- Standard highway use with regular greasing: 100,000–150,000 miles is reasonable for a greaseable U-joint that is serviced every 5,000–7,500 miles.
- Sealed (non-greaseable) U-joints: Typically last 80,000–120,000 miles under normal driving conditions before the factory grease breaks down.
- Off-road use, towing, or lifted vehicles: U-joints in these applications experience higher angles and stress loads and may need replacement every 30,000–60,000 miles, particularly on front axle shafts operating at steep angles due to suspension lift.
- Neglected greasing: A greaseable U-joint that is never serviced can fail in as few as 20,000–40,000 miles as the needle bearings run dry and develop corrosion pitting.
As a best practice, inspect U-joints visually and by feel — grasping the driveshaft and checking for play — every time the vehicle is on a lift for an oil change. Replace proactively at the first sign of perceptible play or rust weeping from the bearing caps rather than waiting for audible symptoms. A U-joint that separates completely at highway speed can cause catastrophic damage to the vehicle's floor and brake lines — and becomes a serious safety hazard.
Common U-Joint Replacement Mistakes and How to Avoid Them
Even mechanically experienced DIYers make these errors during U-joint replacement. Knowing them in advance saves time and prevents a comeback job:
- Not marking driveshaft phase before removal. Reinstalling the driveshaft rotated even one spline off from its original position creates an imbalance that causes vibration indistinguishable from a bad U-joint. Always mark before you remove.
- Leaving snap rings in place while pressing. Attempting to press a bearing cap while its snap ring is still seated will gouge the yoke bore and may permanently damage the yoke. Confirm all four snap rings are fully removed before pressing begins.
- Installing a binding U-joint. A newly installed U-joint that binds in any position is incorrectly installed — typically because a bearing cap was pressed in slightly cocked. A binding U-joint will fail prematurely and may cause vibration even though it is brand new. Always check for smooth, free movement through the full range of motion before reinstalling the driveshaft.
- Not seating snap rings fully. A snap ring that is not fully bottomed in its groove will pop out under load, releasing the bearing cap and causing immediate U-joint failure. After pressing each cap, tap the yoke sharply and verify the snap ring is seated flush in its groove.
- Using the wrong U-joint series. Installing a 1310-series U-joint in a yoke designed for a 1350 is a common error when ordering by vehicle application rather than measuring. The smaller cap diameter will be loose in the bore. Always cross-reference with cap diameter and width measurements from the old U-joint.
- Over-greasing a new U-joint. Pumping excessive grease into a new U-joint can blow out the bearing seals, contaminating the needle bearings and causing premature failure. Grease until it just begins to weep from all four caps, then stop.