English
 中文简体
中文简体How to Fix a U-Joint: Driveshaft & Steering Universal Joint Guide
Content
- 1 Can You Fix a U-Joint, or Does It Need Full Replacement?
- 2 What Is a U-Joint and What Does It Do?
- 3 Symptoms of a Bad U-Joint: How to Diagnose Before You Fix
- 4 Tools and Parts You Need to Fix a U-Joint
- 5 How to Fix a Driveshaft U-Joint: Step-by-Step
- 6 How to Fix a Steering U-Joint
- 7 Driveshaft U-Joint vs. Steering U-Joint: Key Differences at a Glance
- 8 Common U-Joint Replacement Mistakes and How to Avoid Them
- 9 How Long Do U-Joints Last and When to Schedule Replacement
Can You Fix a U-Joint, or Does It Need Full Replacement?
In almost every case, a bad universal joint (U-joint) must be replaced entirely, not repaired. U-joints are precision components with hardened steel trunnions, needle bearings, and bearing caps — once the bearings corrode, seize, or develop play, there is no practical way to restore them to spec. The good news: replacement is a well-defined DIY job that costs $20–$80 in parts for most vehicles, versus $150–$400 at a shop. A driveshaft U-joint replacement takes 1–3 hours with basic hand tools; a steering U-joint typically takes 30–90 minutes.
The one exception is early-stage U-joint noise caused purely by lack of lubrication on greaseable (Zerk-fitted) joints. In that case, greasing the joint through the Zerk fitting may extend its life — but only if no bearing play or corrosion is present. When in doubt, replace it.
What Is a U-Joint and What Does It Do?
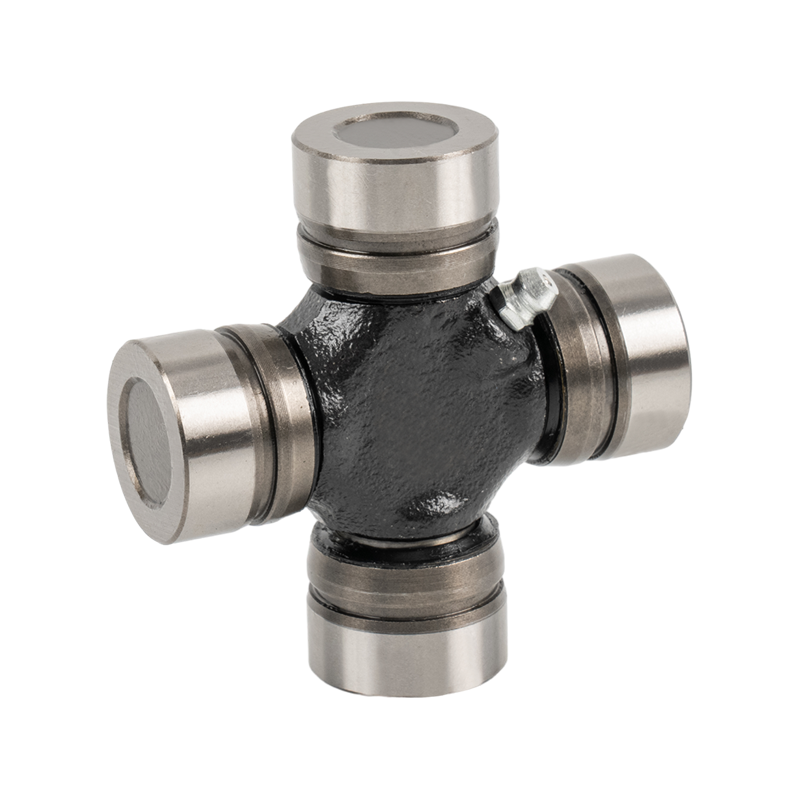
A universal joint (U-joint) is a mechanical coupling that transmits rotational torque between two shafts that meet at an angle. The cross-shaped center piece — called the spider or trunnion cross — connects two yokes via four bearing caps packed with needle bearings, allowing the joint to flex through a range of angles (typically up to 30–35 degrees) while still transferring power.
U-joints appear in two critical locations on most rear-wheel drive and four-wheel drive vehicles:
- Driveshaft U-joints — connect the transmission output shaft to the driveshaft, and the driveshaft to the differential pinion. They handle high torque loads at varying angles as the suspension moves.
- Steering U-joints — connect sections of the steering column and intermediate shaft, allowing the column to change direction between the steering wheel and the steering rack or gearbox. They transmit steering input, not drivetrain torque.
Symptoms of a Bad U-Joint: How to Diagnose Before You Fix
Catching a failing U-joint early prevents driveshaft separation — a catastrophic failure that can lodge the shaft into the road or vehicle floor. Know these warning signs:
Driveshaft U-Joint Failure Symptoms
- Clunking or banging noise when shifting from Park to Drive, or under acceleration and deceleration — the most common and earliest symptom
- Vibration felt through the floor or seat at speeds above 30–45 mph, worsening with acceleration
- Squeaking or squealing at low speed — often caused by dry needle bearings before full seizure
- Vehicle won't move despite engine running — indicates a U-joint has completely failed and separated the drivetrain
- Visible rust streaks or grease slung around the driveshaft — a bearing cap has cracked or a seal has failed
Steering U-Joint Failure Symptoms
- Clunking or popping felt through the steering wheel when turning, especially at low speed or in parking lots
- Steering wheel play or looseness — a worn steering U-joint introduces slack into the steering column
- Binding or stiff spot at a specific point in the steering rotation — indicates a seized needle bearing
- Shudder through the wheel when driving over bumps at speed
Physical Inspection Test
With the vehicle safely raised and supported on jack stands, grip the driveshaft near each U-joint and attempt to rotate it clockwise and counterclockwise while holding the adjoining yoke stationary. Any detectable rotational play — even 1–2 mm — indicates the U-joint needs replacement. Also push and pull axially on the joint; end-play in the bearing caps is another sign of wear. Visually inspect for rust, cracked bearing caps, or missing snap rings.
Tools and Parts You Need to Fix a U-Joint
Gather everything before starting. Mid-job parts runs are the most common cause of incomplete repairs.
| Item | Purpose | Notes |
|---|---|---|
| Replacement U-joint (OEM or quality aftermarket) | Main repair part | Match by vehicle make/model or measure cross dimensions |
| U-joint press or bench vise | Press bearing caps in and out | A socket-and-vise method works without a dedicated press |
| Snap ring pliers (internal) | Remove and install retaining snap rings | Essential — do not substitute with screwdrivers |
| Hammer and brass punch | Drive out stubborn bearing caps | Brass prevents yoke damage |
| Floor jack and jack stands | Raise and support vehicle safely | Never work under a vehicle on a jack alone |
| Torque wrench and socket set | Remove and reinstall driveshaft bolts | Typical driveshaft U-bolt torque: 15–20 ft-lbs |
| Paint marker or scribe | Mark driveshaft and yoke alignment before removal | Critical to prevent driveline vibration after reassembly |
| Penetrating oil (PB Blaster, etc.) | Free corroded bearing caps and U-bolts | Apply 20–30 minutes before disassembly |
| Wheel bearing grease | Pre-pack needle bearings before installation | Only needed if not pre-greased from manufacturer |
How to Fix a Driveshaft U-Joint: Step-by-Step
This procedure covers the most common driveshaft U-joint replacement on a rear-wheel drive vehicle. Four-wheel drive and front-axle U-joints follow the same principles with additional disassembly steps.
Step 1: Mark and Remove the Driveshaft
- Raise the vehicle on jack stands. Chock the front wheels and set the parking brake.
- Mark the driveshaft-to-differential flange orientation with a paint marker before any disassembly. This alignment mark is critical — reinstalling the shaft 180 degrees out causes immediate vibration.
- Remove the four U-bolts or flange bolts at the differential end. On slip-yoke designs (at the transmission), simply slide the front yoke out of the transmission tail housing.
- Support the driveshaft carefully and lower it to the ground. Wrap a rag around the slip yoke to prevent transmission fluid loss.
Step 2: Remove the Old U-Joint
- Using snap ring pliers, remove all four snap rings from the bearing cap grooves in the yoke. These are small and easily dropped — work over a clean surface.
- Position the yoke in a bench vise with a large socket (slightly smaller than the bearing cap diameter) under one cap and a socket (slightly larger) above the opposite cap.
- Tighten the vise to press the upper bearing cap down through the yoke ear, which pushes the lower cap upward into the large socket. The trunnion cross will follow.
- Rotate the yoke 180 degrees and repeat to remove the opposite cap. Then press out the remaining two caps from the second yoke axis.
- If caps resist, apply penetrating oil and use a brass punch and hammer to break the corrosion. Never strike the yoke directly with a steel hammer — this cracks the ears.
Step 3: Clean and Inspect the Yoke
- Clean the bearing cap bores with a wire brush and solvent. Remove any rust, burrs, or debris — any irregularity will cause the new caps to seat improperly.
- Inspect the yoke ears for cracks, especially around the snap ring grooves and bore edges. A cracked yoke must be replaced — a U-joint pressed into a cracked yoke will fail immediately.
- Verify the snap ring grooves are clean and undamaged. Grooves with rounded edges won't retain snap rings under torque.
Step 4: Install the New U-Joint
- Remove two opposite bearing caps from the new trunnion cross. Keep the needle bearings in place — they fall out easily. If the bearings are loose, apply a thin layer of grease to hold them against the cap walls.
- Insert the trunnion cross into the yoke and align one trunnion with a yoke bore. Start one bearing cap by hand, then the opposite cap on the other side.
- Use the vise and socket method to press both caps simultaneously into the yoke bores until they are fully seated below the snap ring groove.
- Install both snap rings. Confirm each snap ring seats fully in its groove — a partially seated snap ring will allow the bearing cap to walk out under load within miles of driving.
- Rotate the joint by hand. It should move freely through its full range with no binding. Light stiffness from new grease is normal; hard spots indicate a needle bearing has been dislodged — disassemble and recheck.
- Repeat the process for the remaining two bearing caps on the second yoke axis.
Step 5: Reinstall the Driveshaft
- Align the paint marks made during removal and slide the slip yoke back into the transmission.
- Bolt the differential flange using new U-bolts if the originals show rust or deformation. Torque to the manufacturer's specification — typically 15–20 ft-lbs for U-bolts, or 55–80 ft-lbs for flange bolts, depending on vehicle.
- If the new U-joint has a Zerk grease fitting, pump 2–3 shots of chassis grease into it before the first test drive.
- Lower the vehicle and test drive, starting at low speed and gradually increasing. Any vibration above 45 mph suggests a driveshaft balance or alignment issue — recheck the orientation marks.
How to Fix a Steering U-Joint
Steering U-joints are smaller than driveshaft joints and transmit far less torque, but their failure directly compromises steering control — making them equally urgent to address. Many steering U-joints are pressed and pinned rather than snap-ring retained, so confirm your specific design before starting.
Locate and Access the Steering U-Joint
The steering U-joint is typically found on the intermediate steering shaft — the collapsible shaft running between the lower steering column and the steering rack or gearbox. On most vehicles it is visible under the hood, just above the firewall. Some vehicles have two U-joints on the intermediate shaft; replace both if either shows wear.
Steering U-Joint Replacement Steps
- Mark the shaft-to-yoke orientation with a paint marker at every connection point. Steering geometry is sensitive — incorrect phasing causes steering effort variation through the wheel's rotation.
- Locate the pinch bolt or roll pin securing the yoke to the shaft. Remove the pinch bolt (typically 10–13mm) or drive out the roll pin with a punch.
- Slide the intermediate shaft off the steering rack input shaft and column shaft. Note: some vehicles require partial removal of the dashboard or firewall grommet for access.
- Press out the U-joint bearing caps using the same vise-and-socket technique as the driveshaft procedure. Steering yoke ears are smaller and more delicate — use appropriately sized sockets and apply force gradually.
- Install the new U-joint, confirm all snap rings or retaining clips are fully seated, and verify the joint moves freely with no binding.
- Reinstall the intermediate shaft, aligning all orientation marks. Torque the pinch bolt to specification — typically 15–25 ft-lbs. A loose pinch bolt is a direct steering failure risk.
- Turn the steering wheel lock-to-lock before starting the engine to confirm smooth, binding-free operation throughout the full range of motion.
Driveshaft U-Joint vs. Steering U-Joint: Key Differences at a Glance
| Factor | Driveshaft U-Joint | Steering U-Joint |
|---|---|---|
| Function | Transmits drivetrain torque | Transmits steering input |
| Size | Large (1.5–2"+ cross diameter) | Small (0.75–1.25" cross diameter) |
| Retention Method | Snap rings or U-bolts | Snap rings, pinch bolts, or roll pins |
| Typical Part Cost | $15–$80 | $20–$120 (often sold with shaft) |
| DIY Difficulty | Moderate | Moderate (access can be tight) |
| Failure Consequence | Loss of drive, driveshaft drop | Loss of steering control |
| Greaseable Version Available | Yes (Zerk-fitted options) | Rarely |
Common U-Joint Replacement Mistakes and How to Avoid Them
- Skipping the alignment marks. Reinstalling a driveshaft 180 degrees out of phase causes immediate and severe vibration. Always mark before removal — a 30-second step that prevents hours of troubleshooting.
- Not fully seating snap rings. A snap ring that isn't fully in its groove will allow the bearing cap to eject under load within miles. After installation, tap the yoke lightly with a hammer — a properly seated snap ring produces a solid sound; a loose one rattles.
- Dislodging needle bearings during installation. If a single needle bearing falls out and isn't noticed, the remaining bearings overload and fail rapidly. If bearings fall, disassemble and reload the cap completely.
- Using a steel hammer directly on the yoke. Always use a brass punch or a socket as an intermediate driver. Steel-on-steel impacts crack yoke ears — a $300–$600 part failure.
- Buying a mismatched U-joint. U-joints are measured by cross diameter and overall width — even a 1mm size mismatch prevents proper seating. Verify your part against the old joint dimensions or your vehicle's OEM part number.
- Ignoring the adjacent U-joint. If one end of a driveshaft has a worn U-joint, the other end has typically experienced the same age and load. Replacing both at the same time costs only an extra $20–$50 in parts and saves a second complete disassembly within months.
How Long Do U-Joints Last and When to Schedule Replacement
U-joint service life varies significantly based on vehicle type, operating conditions, and maintenance. Under normal on-road use, driveshaft U-joints typically last 100,000–150,000 miles. Off-road use, high-torque applications, and lack of lubrication on greaseable joints dramatically shorten this to 30,000–50,000 miles or less.
Steering U-joints last longer in most cases — often 150,000+ miles — because they transmit far less force. However, exposure to road salt, dirt, and moisture in the engine bay accelerates wear. Inspect them during every major service on high-mileage vehicles.
For vehicles with greaseable driveshaft U-joints, lubricate every 5,000 miles or at every oil change using chassis grease (NLGI Grade 2). Pump grease slowly until fresh grease appears at all four bearing cap seals — this purges water and contaminants and can triple U-joint service life compared to neglected joints.